Hands on with Fedora, KVM and Cumulus VX
Cumulus Linux is a network operating system based on Debian that runs on top of industry standard networking hardware. By providing a software-only solution, Cumulus is enabling disaggregation of data center switches similar to the x86 server hardware/software disaggregation. In addition to the networking features you would expect from a network operating system like L2 bridging, Spanning Tree Protocol, LLDP, bonding/LAG, L3 routing, and so on, it enables users to take advantage of the latest Linux applications and automation tools, which is in my opinion its true power.
Cumulus VX is a community-supported virtual appliance that enables network engineers to preview and test Cumulus Networks technology. The appliance is available in different formats (for VMware, VirtualBox, KVM, and Vagrant environments), and since I am running Fedora on my laptop the easiest thing for me was to use the KVM qcow2 image to try it out.
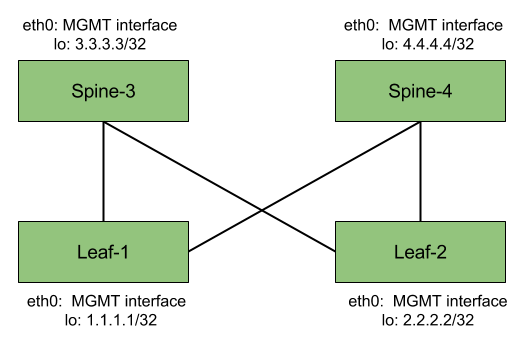
My goal is to build a four node leaf/spine topology. To form the fabric, each leaf will be connected to each spine, so we will end up with two “fabric facing” interfaces on each switch. In addition, I want to have a separate management interface on each device I can use for SSH access as well as automation purposes (Ansible being an immediate suspect), and a loopback interface to be used as the router-id.

Prerequisites
-
Install KVM and related virtualization packages. I am running Fedora 22 and used
yum groupinstall "Virtualization\*"to obtain the latest versions of libvirt, virt-manager, qemu-kvm and associated dependencies. - From the Virtual Machine Manager, create four basic isolated networks (without IP, DHCP or NAT settings). Those will serve as transport for the point-to-point links between our switches. I named them as follows:
- net1
- net2
- net3
- net4
- Download the KVM qcow2 image from the Cumulus website. At the time of writing the image is based on Cumulus Linux v2.5.5. You would want to copy it four times, and name them as follows:
- leaf1.qcow2
- leaf2.qcow2
- spine3.qcow2
- spine4.qcow2
Creating the VMs
While creating each VM you will need to specify the network settings, in particular what interfaces you want to be created, what networks they should be part of, and what is their L2 (MAC) information. To ease troubleshooting, I came out with my own convention for the interfaces MAC addresses.
Leaf1:
- Leaf1 should have three interfaces:
- One belonging to the default network - a network created by virt-manager with DHCP and NAT enabled, and will be used for the management access.
- One belonging to net1, which is going to be used for the connection between leaf1 and spine3. Behind the scenes, virt-manager created a Linux bridge for this network.
- One belonging to net2, which is going to be used for the connection between leaf1 and spine4. Behind the scenes, virt-manager created a Linux bridge for this network.
- Make sure to adjust the path to specify the location of the image:
sudo virt-install --os-variant=generic --ram=256 --vcpus=1 --network=default,model=virtio,mac=00:00:00:00:00:11 --network network=net1,model=virtio,mac=00:00:01:00:00:13 --network network=net2,model=virtio,mac=00:00:01:00:00:14 --boot hd --disk path=/home/nyechiel/Downloads/VX/leaf1.qcow2,format=qcow2 --name=leaf1
Leaf2:
- Leaf2 should have three interfaces:
- One belonging to the default network - a network created by virt-manager with DHCP and NAT enabled, and will be used for the management access.
- One belonging to net3, which is going to be used for the connection between leaf2 and spine3. Behind the scenes, virt-manager created a Linux bridge for this network.
- One belonging to net4, which is going to be used for the connection between leaf2 and spine4. Behind the scenes, virt-manager created a Linux bridge for this network.
- Make sure to adjust the path to specify the location of the image:
sudo virt-install --os-variant=generic --ram=256 --vcpus=1 --network=default,model=virtio,mac=00:00:00:00:00:22 --network network=net3,model=virtio,mac=00:00:02:00:00:23 --network network=net4,model=virtio,mac=00:00:02:00:00:24 --boot hd --disk path=/home/nyechiel/Downloads/VX/leaf2.qcow2,format=qcow2 --name=leaf2
Spine3:
- Spine3 should have three interfaces:
- One belonging to the default network - a network created by virt-manager with DHCP and NAT enabled, and will be used for the management access.
- One belonging to net1, which is going to be used for the connection between leaf1 and spine3. Behind the scenes, virt-manager created a Linux bridge for this network.
- One belonging to net3, which is going to be used for the connection between leaf2 and spine3. Behind the scenes, virt-manager created a Linux bridge for this network.
- Make sure to adjust the path to specify the location of the image:
sudo virt-install --os-variant=generic --ram=256 --vcpus=1 --network=default,model=virtio,mac=00:00:00:00:00:33 --network network=net1,model=virtio,mac=00:00:03:00:00:31 --network network=net3,model=virtio,mac=00:00:03:00:00:32 --boot hd --disk path=/home/nyechiel/Downloads/VX/spine3.qcow2,format=qcow2 --name=spine3
Spine4:
- Spine4 should have three interfaces:
- One belonging to the default network - a network created by virt-manager with DHCP and NAT enabled, and will be used for the management access.
- One belonging to net2, which is going to be used for the connection between leaf1 and spine4. Behind the scenes, virt-manager created a Linux bridge for this network.
- One belonging to net4, which is going to be used for the connection between leaf2 and spine4. Behind the scenes, virt-manager created a Linux bridge for this network.
- Make sure to adjust the path to specify the location of the image:
sudo virt-install --os-variant=generic --ram=256 --vcpus=1 --network=default,model=virtio,mac=00:00:00:00:00:44 --network network=net2,model=virtio,mac=00:00:04:00:00:41 --network network=net4,model=virtio,mac=00:00:04:00:00:42 --boot hd --disk path=/home/nyechiel/Downloads/VX/spine4.qcow2,format=qcow2 --name=spine4
Verifying the hypervisor topology
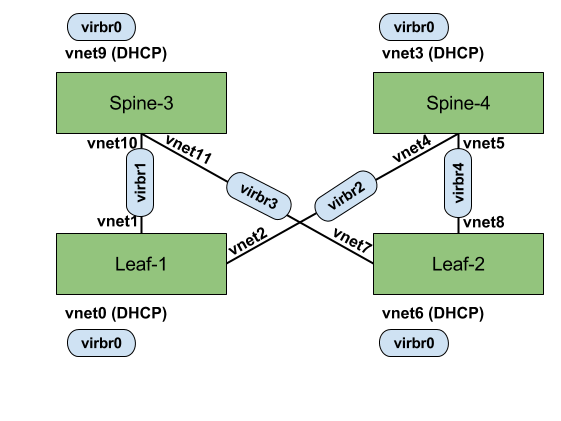
Before we log in to any of the newly created VMs, I first would like to verify the configuration and make sure that we have got the right connectivity in place. Using ifconfig on my Fedora system, and by looking into the MAC addresses, I correlated between the Linux bridges created by virt-manager (virbr0, virbr1, virbr2, virbr3, virbr4) and the virtual Ethernet devices (vnet). This is giving me the hypervisor point of view, and going to be really useful for troubleshooting purposes. I came up with this topology:

Useful commands to use here are brctl show and brctl showmacs. For example, let’s examine the link between leaf1 and spine3 (note that libvirt based the MAC on the configured guest MAC address with high byte set to 0xFE):
$ ip link show vnet1 | grep link link/ether fe:00:01:00:00:13 brd ff:ff:ff:ff:ff:ff$ ip link show vnet10 | grep link link/ether fe:00:03:00:00:31 brd ff:ff:ff:ff:ff:ff
$ brctl show virbr1
$ brctl showmacs virbr1
Verifying the fabric topology
Now that we have the basic networking setup between the VMs and we understand the topology, we can jump into the switches and confirm their view. The switches can be accessed with the username “cumulus” and the password “CumulusLinux!”. This is also the password for root.
Using console access to the VMs and the ifconfig command we can learn a couple of things:
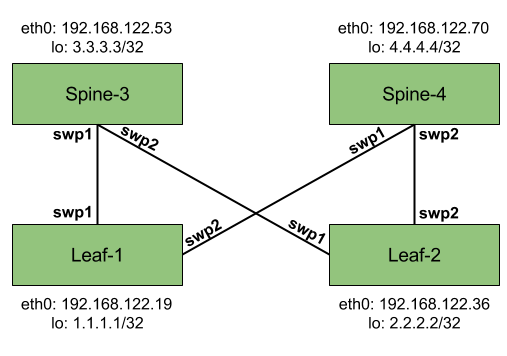
- eth0 is the base interface on each switch used for management purposes. It picked up an address from the 192.168.122.0/22 range, which is what virt-manager used to setup the “default” network. SSH to this address is enabled by default with standard TCP port 22.
- The “fabric” interfaces are swp1 and swp2.
Based on this information we can build up our final topology, which is a representation of the actual fabric:

Now what?
Now that we have the basic topology setup and the right diagrams to support us, we can go on and configure things. Cumulus has got some good level of documentation so I will let you take it from here. You can configure things manually using the CLI (which is really a bash system with standard Linux commands) or use automation tools to control the switch.
Using the CLI and following the documentation, it was pretty straightforward to me to configure hostnames, IP addresses and bring up OSPF and BFD (using Quagga) between the switches. Next I plan to play with the more advanced stuff (personally I want to test out BGP and IPv6 configurations), and try to automate things using Ansible. Happy testing!
Comments
No comments found for this article.
Join the discussion for this article on this issue. Comments will appear on this page instantly.